Android Market offers a licensing service that lets you enforce licensing policies for paid applications that you publish through Android Market. With Android Market Licensing, your applications can query Android Market at run time to obtain their licensing status for the current user, then allow or disallow further use as appropriate.
When an application checks the licensing status, the Market server signs the licensing status response using a key pair that is uniquely associated with the publisher account. Your application stores the public key in its compiled.apk file and uses it to verify the licensing status response.
Application, Android Market client, and server
In the licensing service, an application does not query the licensing server directly, but instead calls the Android Market client over remote IPC to initiate a license request. In the license request:
· The application provides its package name and that is later used to validate any response from the server, as well as a callback over which the response can be returned asynchronously.
· The Android Market client, which has greater permissions than the application, collects the necessary information about the user and the device, such as the device's primary Google account username, IMSI, and other information. It then sends the license check request to the server on behalf of the application.
· The server evaluates the request using all available information, attempting to establish the user's identity to a sufficient level of confidence. The server then checks the user identity against purchase records for the application and returns a license response, which the Android Market client returns to the application over the IPC callback.
Licensing Verification Library
The Android SDK includes a License Verification Library (LVL) that you can download and use as the basis for your application's licensing implementation. The key LVL interfaces are:
· Policy - Your implementation determines whether to allow access to the application, based on the license response received from the server and any other data available. It also lets you manage the handling of license checks that result in errors, such as network errors
· LicenseCheckerCallback - Your implementation manages access to the application, based on the result of the Policy's handling of the license response. Your implementation can manage access in any way needed, including displaying the license result in the UI or directing the user to purchase the application
To help you get started with a Policy, the LVL provides two fully complete Policy implementations that you can use without modification or adapt to your needs:
1. ServerManagedPolicy - Flexible Policy that uses settings provided by the licensing server to manage response caching and access to the application while the device is offline (such as when the user is on an airplane). For most applications, the use of ServerManagedPolicy is highly recommended.
2. StrictPolicy – Restrictive Policy that does not cache any response data and allows the application access only when the server returns a licensed response
Requirements and limitations
· Only paid applications published through Market can use the service.
· An application can use the service only if the Android Market client is running Android 1.5 (API level 3) or higher.
· To complete a license check, the licensing server must be accessible over the network.
· The security of your application's licensing controls ultimately relies on the design of your implementation itself.
· Adding licensing to an application does not affect the way the application functions when run on a device that does not offer Android Market.
· Licensing is currently for paid apps only, since free apps are considered licensed for all users. If your application is already published as free, you won't be able to upload a new version that uses licensing
Replacement for copy protection
Android Market Licensing is a flexible, secure mechanism for controlling access to your applications. It effectively replaces the copy-protection mechanism offered on Android Market and gives you wider distribution potential for your applications. For example, a copy-protected application cannot be downloaded from Market to a device that provides root access, and the application cannot be installed to a device's SD card.
Setting up a Publisher Account
To register as an Android Market developer and set up your publisher account, visit the Android Market publisher site: http://market.android.com/publish
Once your publisher account is set up, use the account to:
· Obtain a public key for licensing
· Debug and test an application's licensing implementation, prior to publishing the application
· Publish the applications to which you have added licensing support
Implementing a Policy
The Policy interface declares two methods, allowAccess() and processServerResponse(), which are called by a LicenseChecker instance when processing a response from the license server. It also declares an enum called LicenseResponse, which specifies the license response value passed in calls to processServerResponse().
· processServerResponse() - Lets you pre-process the raw response data received from the licensing server, prior to determining whether to grant access.
A typical implementation would extract some or all fields from the license response and store the data locally to a persistent store, such as through SharedPreferences storage, to ensure that the data is accessible across application invocations and device power cycles. For example, a Policy would maintain the timestamp of last successful license check, the retry count, the license validity period, and similar information in a persistent store, rather than resetting the values each time the application is launched.
· allowAccess() - determines whether to grant the user access to your application, based on any available license response data. For example , an implementation of allowAccess() should only return true if the user is licensed to use the application, as determined by the licensing server
If you are designing a custom policy, we recommend that the Policy:
1. Caches (and properly obfuscates-encrypting) the most recent successful license response in local persistent storage.
2. Returns the cached response for all license checks, for as long as the cached response is valid, rather than making a request to the licensing server.
3. Uses an exponential backoff period, if retrying any requests the result in errors. Note that the Android Market client automatically retries failed requests, so in most cases there is no need for your Policy to retry them.
4. Provides for a "grace period" that allows the user to access your application for a limited time or number of uses, while a license check is being retried.
Implementing an Obfuscator
Because the Policy will use stored license response data to determine whether to allow or disallow access to the application, it must ensure that any stored data is secure and cannot be reused or manipulated by a root user on a device.
The LVL includes a full and recommended implementation of the Obfuscator interface called AESObfuscator. The implementation is integrated with the LVL sample application and serves as the default Obfuscator in the library.
AESObfuscator - The Obfuscator seeds the encryption using three data fields provided by the application:
1. A salt — an array of random bytes to use for each (un)obfuscation.
2. An application identifier string, typically the package name of the application.
3. A device identifier string, derived from as many device-specific sources as possible, so as to make it as unique.
Setting Up the Development Environment

1. Downloading the Market Licensing component - SDK tools using the Android SDK and AVD Manager
In the Available Packages panel, select Market Licensing package and click install
2. Setting up the runtime environment for development
There are two types of runtime environment that you can use:
· An Android-powered device that includes the Android Market application, or
· An Android emulator running the Google APIs Add-on, API level 8 (release 2) or higher
3. Setting up the Licensing Verification Library – In Ecplipse
1. Use the New Project Wizard to create a new project from existing sources. Select the LVL's library directory (the directory containing the library's AndroidManifest.xml file) as the project root.
2. When you are creating the library project, you can select any application name, package, and set other fields as needed.
3. For the library's build target, select Android 1.5 (API level 3) or higher.
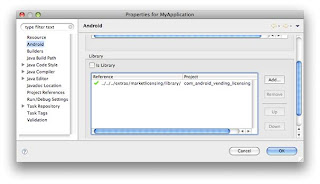
4. Including the LVL library project in your application
Next, open the application's project properties window, as shown below. Select the "Android" properties group and click Add, then choose the LVL library project (com_android_vending_licensing) and click OK.
Checking the license from your application's main Activity
1. Add imports - First, open the class file of the application's main Activity and import LicenseChecker and LicenseCheckerCallback from the LVL package.
import com.android.vending.licensing.LicenseChecker;
import com.android.vending.licensing.LicenseCheckerCallback;
import com.android.vending.licensing.ServerManagedPolicy;
import com.android.vending.licensing.AESObfuscator;
2. The first step w ould be to add the check license permission to the AndroidManifest.xml inside < />
3. Now time to implement the actual code.
public class Splash extends Activity {
private LicenseChecker mChecker;
private LicenseCheckerCallback mLicenseCheckerCallback;
private static final String BASE64_PUBLIC_KEY = "Copy from developer account";
// Generate 20 random bytes, and put them here.
private static final byte[] SALT = new byte[] {
-20, 30, 50, -70, 33, -100, 32, -90, -88, 104, 12,
-10, 72, -34, 115, 21, 62, 35, -12, 97
};
private AESObfuscator mObsfuscator;
private String android_id;
The BASE64_PUBLIC_KEY you can find by going to Developer Console and clicking on edit. If you scroll down the page you will see your public key.
Next is the 20 random numbers. This is called an Obfuscator which basically takes these numbers to make your code harder for pirates to crack. Find a random number generator and fill out this array.(I don't know what the limit for numbers is so I just randomly chose between -100 and 100)
The android_id string will be a persons unique phone id which will coincide with the license checking.
Next we have the onCreate function.
/** Called when the activity is first created. */
@Override
public void onCreate(Bundle icicle) {
super.onCreate(icicle);
setContentView(R.layout.splash);
android_id = Secure.getString(this.getContentResolver(), Secure.ANDROID_ID);
mObsfuscator = new AESObfuscator(SALT, getPackageName(), android_id);
ServerManagedPolicy serverPolicy = new ServerManagedPolicy(this,mObsfuscator);
mLicenseCheckerCallback = new MyLicenseCheckerCallback();
mChecker = new LicenseChecker(
this, serverPolicy,
BASE64_PUBLIC_KEY // Your public licensing key.
);
mChecker.checkAccess(mLicenseCheckerCallback);
}
The here we are getting the unique android id, putting it into the Obsfuscator variable along with out 20 random numbers. And it is recommended to use the pre-configured ServerManagedPolicy which I have done here as well.
Next we implement ourselves what to do if the license check returns "allow" or "don't allow"
private class MyLicenseCheckerCallback implements LicenseCheckerCallback {
public void allow() {
if (isFinishing()) {
// Don't update UI if Activity is finishing.
return;
}
// Should allow user access.
Log.w("LicenseChecker", "Allow");
Intent i = new Intent(Splash.this, Main.class);
startActivity(i);
finish();
}
public void dontAllow() {
if (isFinishing()) {
// Don't update UI if Activity is finishing.
return;
}
Log.w("LicenseChecker", "Don't Allow");
showDialog(0);
}
Here when license checker returns allow, I start my main activity. If it returns do not allow then I show a dialog that states that the app is not licensed properly and to please buy the real version on the android market. It also has a link directly to the app in the market. This is kind of neat because if someone does manage to get your apk and tries to install it on their phone, they will get this message and might decide to just buy it.
This next code is part of the license checker callback and it is required by Android just in case something goes wrong that it will catch the error and notify the user. I just added a popup message that someone suggested to put in here.
@Override
public void applicationError(ApplicationErrorCode errorCode) {
if (isFinishing()) {
// Don't update UI if Activity is finishing.
return;
}
toast("Error: " + errorCode.name());
}
}
Almost there =P This next part is implementing the showDialog and toast.
@Override
protected Dialog onCreateDialog(int id) {
// We have only one dialog.
return new AlertDialog.Builder(this)
.setTitle("Application Not Licensed")
.setCancelable(false)
.setMessage(
"This application is not licensed. Please purchase it from Android Market")
.setPositiveButton("Buy App",
new DialogInterface.OnClickListener() {
@Override
public void onClick(DialogInterface dialog,
int which) {
Intent marketIntent = new Intent(
Intent.ACTION_VIEW,
Uri.parse("market://details?id=" + getPackageName()));
startActivity(marketIntent);
finish();
}
})
.setNegativeButton("Exit",
new DialogInterface.OnClickListener() {
@Override
public void onClick(DialogInterface dialog,
int which) {
finish();
}
}).create();
}
public void toast(String string) {
Toast.makeText(this, string, Toast.LENGTH_SHORT).show();
}
Standard alert dialog, where you can see the buy app button is linked to the uri.parse which equals to the Android market link, plus your application package. This will open the Android Market and link directly to your app. And the exit button just exits your application.
This last piece of code is just removing the license checker so the app doesn't FC on close
@Override
protected void onDestroy() {
super.onDestroy();
mChecker.onDestroy();
}
And thats it! Here is the full source code: Android License
A simple implementation that will hopefully do its job. Hope this helps!
For testing the license code follow this link: License Testing
http://developer.android.com/guide/publishing/licensing.html#test-env
Publishing a Licensed Application
When you are finished testing your license implementation, you are ready to publish the application on Android Market. Follow the normal steps to prepare, sign, and then publish the application.
Removing Copy Protection
After uploading your licensed application, remember to remove copy protection from the application, if it is currently used. To check and remove copy protection, sign in to the publisher site and go the application's upload details page. In the Publishing options section, make sure that the Copy Protection radio button selection is "Off".
Considerations for Free Apps
Licensing is currently supported only for paid applications. If you already published your application as free, you won't be able to upload an updated version that includes licensing (that is, an application that uses the same package name and that includes the licensing permission). Here are some points to keep in mind:
· If you want to offer a free version of your application that provides a reduced feature set (or that offers the full feature set for trial period), the free version of your application must not include the licensing permission and must use a different package name than the paid version of the app.
· If you want to offer a paid version of your free application that uses licensing, you can do so under a new package name.
Source : http://developer.android.com/guide/publishing/licensing.html

